by Łukasz Jakóbiec
basicBra!nz — Pathfinder
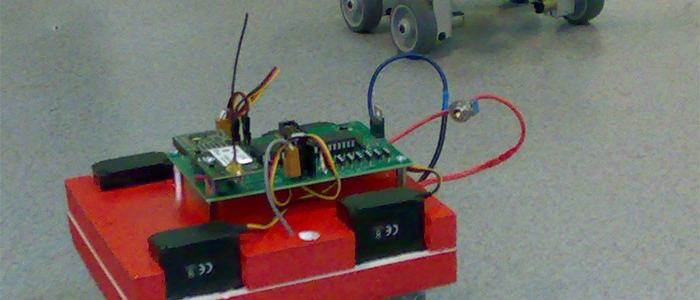
Pathfinder — a robot modelled on the Mars rover, with a holonomic drive. Four-wheel drive, 6V geared motors. The red one is also where I'm testing an encoder.
Pathfinder — a robot modelled on the Mars rover, with a holonomic drive. It has four-wheel drive on 6V motors with built-in gear reduction. As a bonus, the red robot is where I'm testing an encoder :)
About the build
The obvious inspiration here was NASA's Sojourner and Pathfinder — both built to explore the surface of Mars. They reached the planet in 1997 and sent back over 550 photos.
My build is suitably simplified — it isn't made for sand and rocks, and the radio range is decidedly shorter :)
Key features:
- full holonomy — the robot can move in any direction at any time
- 360o field of view from the distance sensors (mapping)
- low power use; camera, light etc. can be turned off remotely
- Bluetooth, RS232, Serial TTL communication
- ADC, SPI, I2C and an extra servo connector exposed
- wireless colour camera
- two interrupt inputs (INT0, INT1)
- encoder built around a reflective sensor
Holonomy here is a modified synchro-drive (wheels run at the same speed but aren't mechanically linked). Servo movement isn't coupled — each wheel can independently turn through 180o. There are convenience commands like "right" and "left" that turn the drive train by a given angle. Communication runs over Bluetooth, which makes the robot pleasant to interact with. The on-board camera is 1.2GHz on purpose — so it doesn't step on the 2.4GHz radio link.
Camera
The cameras stream MJPEG, which means no special software is needed to view the feed.
Communication
The robots use Bluetooth — to connect, you need a computer with a working Bluetooth stack and adapter. Scan for devices, then pair with "basicBRA!NZ" or "sentinel". On Windows the pairing password in both cases is "default".
Serial parameters:
- Baud 115200
- 8 Bit
- no parity
- 1 stop bit
- no CTS/RTS
Commands
To bring the robot into a known state at the start of a session, run:
- reboot
- reboot
- init
Every command must be terminated with /n (ASCII 13).
After a successful "init" the robot replies "Hello at basicBRA!NZ." From that point you can issue commands:
- "dir": flip wheel rotation direction
- "reset": reset servo and speed settings, stop the robot
- "go": drive at the configured speed
- "stop": stop
- "back": drive backwards
- "ff": drive forwards
- "cam": turn on the camera
- "ir": turn on the LED
- "left": turn wheels left by N degrees (1-90)
- "right": turn wheels right by N degrees (1-90)
- "llturn": set wheels to drive in a left arc (1-24)
- "rlturn": set wheels to drive in a right arc (1-24)
- "zero": reset servos to driving position
- "scan": scan surroundings with the Sharp sensor
- "reboot": reboot
- "x": stop robot
- "sh": move servo and read Sharp (30-120)
- "speed": set speed (1000 → slow, 1 → fast)
- "ssize": set number of scans
- "dir": change driving or turning direction
- "adcdump": stream ADC0-3 values every 50ms until a new command is sent
An invalid command returns "ERR".
sonarView
sonarView is a "remote presence" app — you can drive every behaviour of the robot from it.
Features:
- turn camera on/off
- turn the light on/off
- visualise readings from the Sharp distance sensor
- support for Ackermann-like, differential, and "rotate-then-drive" steering modes
- send manual commands to the robot
- visualise the camera feed
To download the program, click the menu on the right. SonarView needs .NET 3.0 installed.
Nothing stops you from using a different framework like Pyro, Player etc.
Talking to the robot
sonarView is a .NET app, but you can equally write your own client in Python or Java.
The Python example needs the following installed (Linux skips pywin32):
- Python 2.6 (or 2.5)
- pywin32
- pySerial
After installing, here's a starter snippet that initialises the robot:
import serial
import time

ser = serial.Serial('com5',115200, timeout=1)  #change COM5 to actual port
#where Pathfinder is located
#creating ser object automatically opens the port

while 1:
    ser.write('reboot%s' % (chr(13))) #reboot robot
    ser.write('init%s' % (chr(13)))    #initialize and sync robot
    print ">>> Robot >>> %s" % (ser.readline()) #get response
    time.sleep(1)
    ser.write('reboot%s' % (chr(13)))
    time.sleep(1)
Pathfinder and swbStick
For testing, you can use swbStick with the firmware that emulates Pathfinder's behaviour.
Flash the HEX file using MCS Electronics Bootloader.
Downloads:
Contact me
Questions, ideas, or spotted a bug? Send me a note.